Any Way to Improve Upload Speed to Another Server via Vmware
This browser is no longer supported.
Upgrade to Microsoft Border to take advantage of the latest features, security updates, and technical support.
Plan chapters and scaling for VMware disaster recovery to Azure
Use this article to plan for chapters and scaling when you replicate on-bounds VMware VMs and concrete servers to Azure by using Azure Site Recovery - Classic.
In preview, you need to create and use Azure Site Recovery replication appliance/multiple appliances to plan capacity.
How do I offset chapters planning?
To learn most Azure Site Recovery infrastructure requirements, assemble information well-nigh your replication environment by running Azure Site Recovery Deployment Planner for VMware replication. For more than data, see Nearly Site Recovery Deployment Planner for VMware to Azure.
Site Recovery Deployment Planner provides a report that has consummate information about compatible and incompatible VMs, disks per VM, and information churn per disk. The tool besides summarizes network bandwidth requirements to meet target RPO and the Azure infrastructure that's required for successful replication and exam failover.
Capacity considerations
| Component | Details |
|---|---|
| Replication | Maximum daily modify charge per unit: A protected machine can employ only one procedure server. A single process server can handle a daily change charge per unit up to 2 TB. So, 2 TB is the maximum daily information change charge per unit that'southward supported for a protected car. Maximum throughput: A replicated machine tin belong to 1 storage business relationship in Azure. A standard Azure Storage account tin handle a maximum of 20,000 requests per 2d. We recommend that you limit the number of input/output operations per second (IOPS) across a source machine to twenty,000. For example, if you have a source auto that has 5 disks and each disk generates 120 IOPS (eight G in size) on the source machine, the source machine is inside the Azure per-disk IOPS limit of 500. (The number of storage accounts required is equal to the total source auto IOPS divided by 20,000.) |
| Configuration server | The configuration server must exist able to handle the daily change rate capacity across all workloads running on protected machines. The configuration machine must have sufficient bandwidth to continuously replicate data to Azure Storage. A best practice is to place the configuration server on the aforementioned network and LAN segment equally the machines that you desire to protect. You tin place the configuration server on a unlike network, merely machines that you lot want to protect should have layer iii network visibility. Size recommendations for the configuration server are summarized in the tabular array in the following section. |
| Process server | The beginning process server is installed past default on the configuration server. You tin deploy additional process servers to scale your environment. The process server receives replication data from protected machines. The process server optimizes information by using caching, pinch, and encryption. Then, the process server sends the information to Azure. The process server car must accept sufficient resource to perform these tasks. The procedure server uses a disk-based cache. Use a carve up cache disk of 600 GB or more to handle information changes that are stored if a network bottleneck or outage occurs. |
Size recommendations for the configuration server and inbuilt process server
A configuration server that uses an inbuilt process server to protect the workload tin handle up to 200 virtual machines based on the following configurations:
| CPU | Memory | Cache disk size | Data change rate | Protected machines |
|---|---|---|---|---|
| 8 vCPUs (2 sockets * 4 cores @ 2.5 GHz) | 16 GB | 300 GB | 500 GB or less | Utilise to replicate fewer than 100 machines. |
| 12 vCPUs (2 sockets * 6 cores @ ii.5 GHz) | eighteen GB | 600 GB | 501 GB to 1 TB | Utilise to replicate 100 to 150 machines. |
| sixteen vCPUs (two sockets * 8 cores @ 2.5 GHz) | 32 GB | 1 TB | >1 TB to 2 TB | Use to replicate 151 to 200 machines. |
| Deploy another configuration server past using an OVF template. | Deploy a new configuration server if you're replicating more than 200 machines. | |||
| Deploy another procedure server. | >2 TB | Deploy a new calibration-out process server if the overall daily data change rate is greater than 2 TB. |
In these configurations:
- Each source machine has 3 disks of 100 GB each.
- We used benchmarking storage of eight shared access signature drives of ten Yard RPM with RAID 10 for cache deejay measurements.
Size recommendations for the process server
The process server is the component that handles information replication in Azure Site Recovery. If the daily alter charge per unit is greater than ii TB, you must add together scale-out procedure servers to handle the replication load. To scale out, you can:
- Increment the number of configuration servers by deploying past using an OVF template. For case, you can protect upwardly to 400 machines past using 2 configuration servers.
- Add together scale-out process servers. Use the scale-out process servers to handle replication traffic instead of (or in add-on to) the configuration server.
The post-obit tabular array describes this scenario:
- You ready a calibration-out process server.
- You configured protected virtual machines to use the scale-out process server.
- Each protected source motorcar has iii disks of 100 GB each.
| Additional process server | Cache deejay size | Data change rate | Protected machines |
|---|---|---|---|
| 4 vCPUs (2 sockets * ii cores @ 2.5 GHz), eight GB of memory | 300 GB | 250 GB or less | Use to replicate 85 or fewer machines. |
| 8 vCPUs (2 sockets * 4 cores @ ii.5 GHz), 12 GB of memory | 600 GB | 251 GB to ane TB | Use to replicate 86 to 150 machines. |
| 12 vCPUs (ii sockets * half-dozen cores @ 2.5 GHz) 24 GB of memory | 1 TB | >1 TB to 2 TB | Use to replicate 151 to 225 machines. |
How you calibration your servers depends on your preference for a scale-up or scale-out model. To scale upwards, deploy a few high-terminate configuration servers and process servers. To scale out, deploy more than servers that have fewer resources. For example, if you desire to protect 200 machines with an overall daily data change rate of 1.v TB, you could accept i of the following deportment:
- Fix a single process server (16 vCPU, 24 GB of RAM).
- Set upward two process servers (two x viii vCPU, ii* 12 GB of RAM).
Command network bandwidth
Later on you use Site Recovery Deployment Planner to calculate the bandwidth y'all demand for replication (initial replication and then the delta), you lot accept a couple of options for decision-making the amount of bandwidth that's used for replication:
- Throttle bandwidth: VMware traffic that replicates to Azure goes through a specific process server. You lot can throttle bandwidth on the machines that are running as procedure servers.
- Influence bandwidth: You tin influence the bandwidth that'southward used for replication by using a couple of registry keys:
- The HKEY_LOCAL_MACHINE\SOFTWARE\Microsoft\Windows Azure Backup\Replication\UploadThreadsPerVM registry value specifies the number of threads that are used for data transfer (initial or delta replication) of a disk. A higher value increases the network bandwidth that'southward used for replication.
- The HKEY_LOCAL_MACHINE\SOFTWARE\Microsoft\Windows Azure Backup\Replication\DownloadThreadsPerVM registry value specifies the number of threads that are used for data transfer during failback.
Throttle bandwidth
-
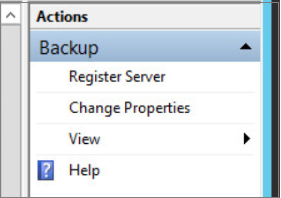
Open up the Azure Backup MMC snap-in on the car you use as the process server. By default, a shortcut for Fill-in is available on the desktop or in the post-obit binder: C:\Plan Files\Microsoft Azure Recovery Services Amanuensis\bin.
-
In the snap-in, select Change Properties.
-
On the Throttling tab, select Enable internet bandwidth usage throttling for fill-in operations. Set the limits for work and not-work hours. Valid ranges are from 512 Kbps to ane,023 Mbps.
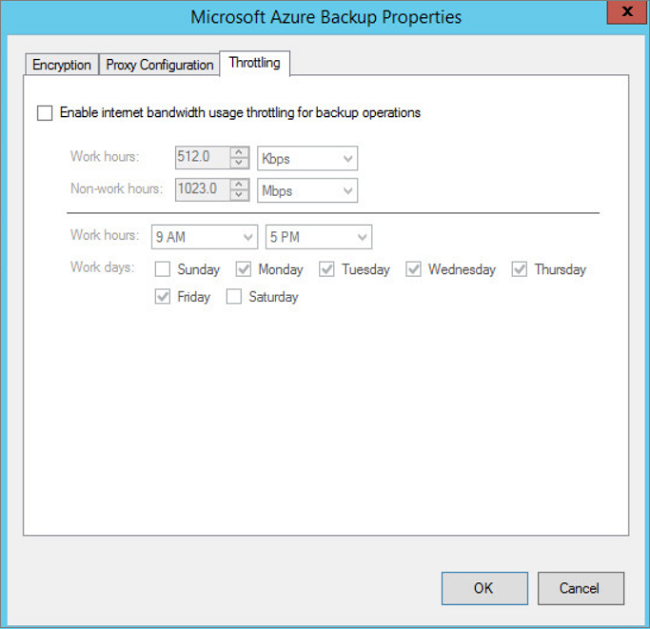
Y'all can also use the Set-OBMachineSetting cmdlet to set throttling. Here's an case:
$mon = [Organisation.DayOfWeek]::Mon $tue = [System.DayOfWeek]::Tuesday Set-OBMachineSetting -WorkDay $mon, $tue -StartWorkHour "nine:00:00" -EndWorkHour "18:00:00" -WorkHourBandwidth (512*1024) -NonWorkHourBandwidth (2048*1024) Set-OBMachineSetting -NoThrottle indicates that no throttling is required.
Alter the network bandwidth for a VM
- In the VM's registry, get to HKEY_LOCAL_MACHINE\SOFTWARE\Microsoft\Windows Azure Backup\Replication.
- To modify the bandwidth traffic on a replicating disk, alter the value of UploadThreadsPerVM. Create the key if it doesn't exist.
- To alter the bandwidth for failback traffic from Azure, modify the value of DownloadThreadsPerVM.
- The default value for each key is 4. In an "overprovisioned" network, these registry keys should be inverse from the default values. The maximum value y'all can employ is 32. Monitor traffic to optimize the value.
Fix up the Site Recovery infrastructure to protect more than 500 VMs
Before yous gear up the Site Recovery infrastructure, access the environment to mensurate the post-obit factors: compatible virtual machines, the daily data modify charge per unit, the required network bandwidth for the RPO yous want to reach, the number of Site Recovery components that are required, and the time it takes to complete the initial replication. Consummate the following steps to gather the required data:
- To measure these parameters, run Site Recovery Deployment Planner on your environment. For helpful guidelines, come across About Site Recovery Deployment Planner for VMware to Azure.
- Deploy a configuration server that meets the size recommendations for the configuration server. If your production workload exceeds 650 virtual machines, deploy another configuration server.
- Based on the measured daily data change rate, deploy scale-out process servers with the help of size guidelines.
- If you expect the information change charge per unit for a disk virtual machine to exceed 2 MBps, ensure that yous use premium managed disks. Site Recovery Deployment Planner runs for a specific time period. Peaks in the data modify rate at other times might not be captured in the written report.
- Set the network bandwidth based on the RPO y'all want to achieve.
- When the infrastructure is set, enable disaster recovery for your workload. To acquire how, come across Set up the source surround for VMware to Azure replication.
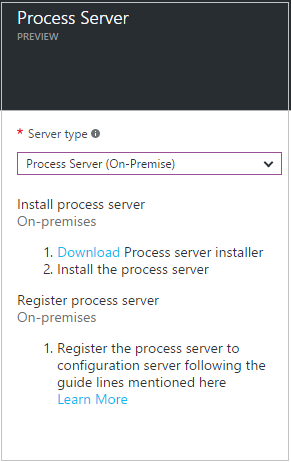
Deploy additional process servers
If you calibration out your deployment beyond 200 source machines or if you have a total daily churn rate of more than ii TB, y'all must add process servers to handle the traffic book. We have enhanced the product in nine.24 version to provide procedure server alerts on when to set up upwardly a calibration-out process server. Gear up the procedure server to protect new source machines or balance the load.
Migrate machines to use the new process server
-
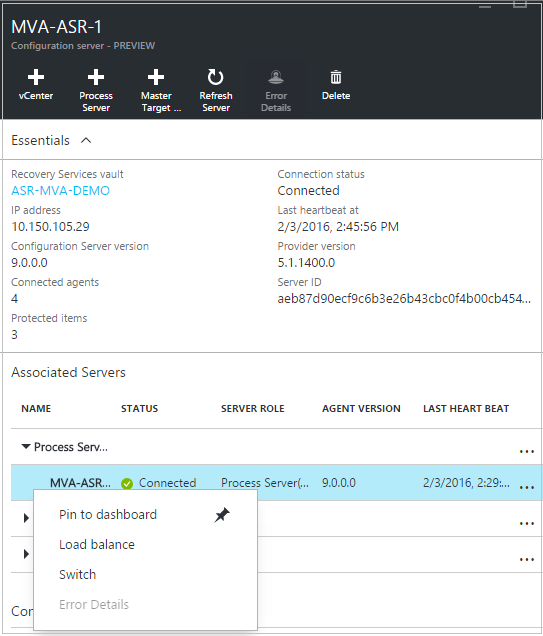
Select Settings > Site Recovery servers. Select the configuration server, and then expand Process servers.
-
Right-click the process server currently in utilise, and then select Switch.
-
In Select target process server, select the new procedure server yous want to use. Then, select the virtual machines that the server will handle. To get information well-nigh the server, select the information icon. To assist yous make load decisions, the boilerplate space that's required to replicate each selected virtual machine to the new process server is shown. Select the check mark to begin replicating to the new process server.
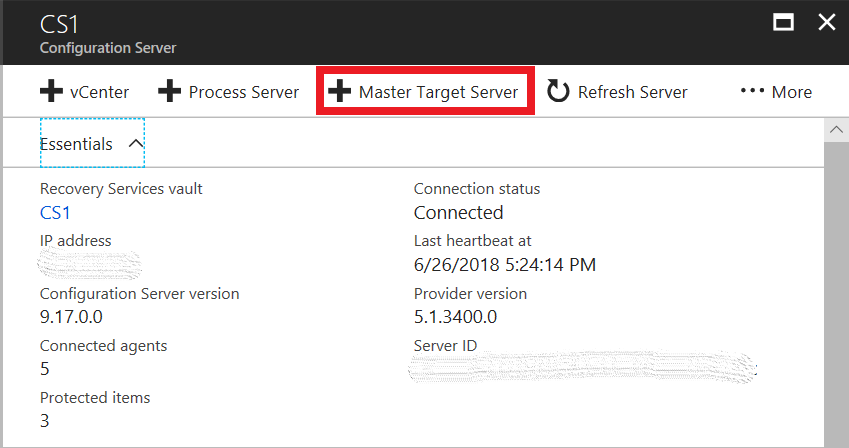
Deploy additional master target servers
In the post-obit scenarios, more than 1 master target server is required:
- Yous want to protect a Linux-based virtual automobile.
- The master target server available on the configuration server doesn't take admission to the datastore of the VM.
- The full number of disks on the principal target server (the number of local disks on server plus the number of disks to exist protected) is greater than lx disks.
To learn how to add a master target server for a Linux-based virtual car, see Install a Linux master target server for failback.
To add together a chief target server for a Windows-based virtual automobile:
-
Go to Recovery Services Vault > Site Recovery Infrastructure > Configuration servers.
-
Select the required configuration server, and and then select Main Target Server.
-
Download the unified setup file, and and so run the file on the VM to ready the principal target server.
-
Select Install master target > Side by side.

-
Select the default installation location, and then select Install.

-
To annals the master target with the configuration server, select Proceed To Configuration.

-
Enter the IP accost of the configuration server, and then enter the passphrase. To learn how to generate a passphrase, come across Generate a configuration server passphrase.
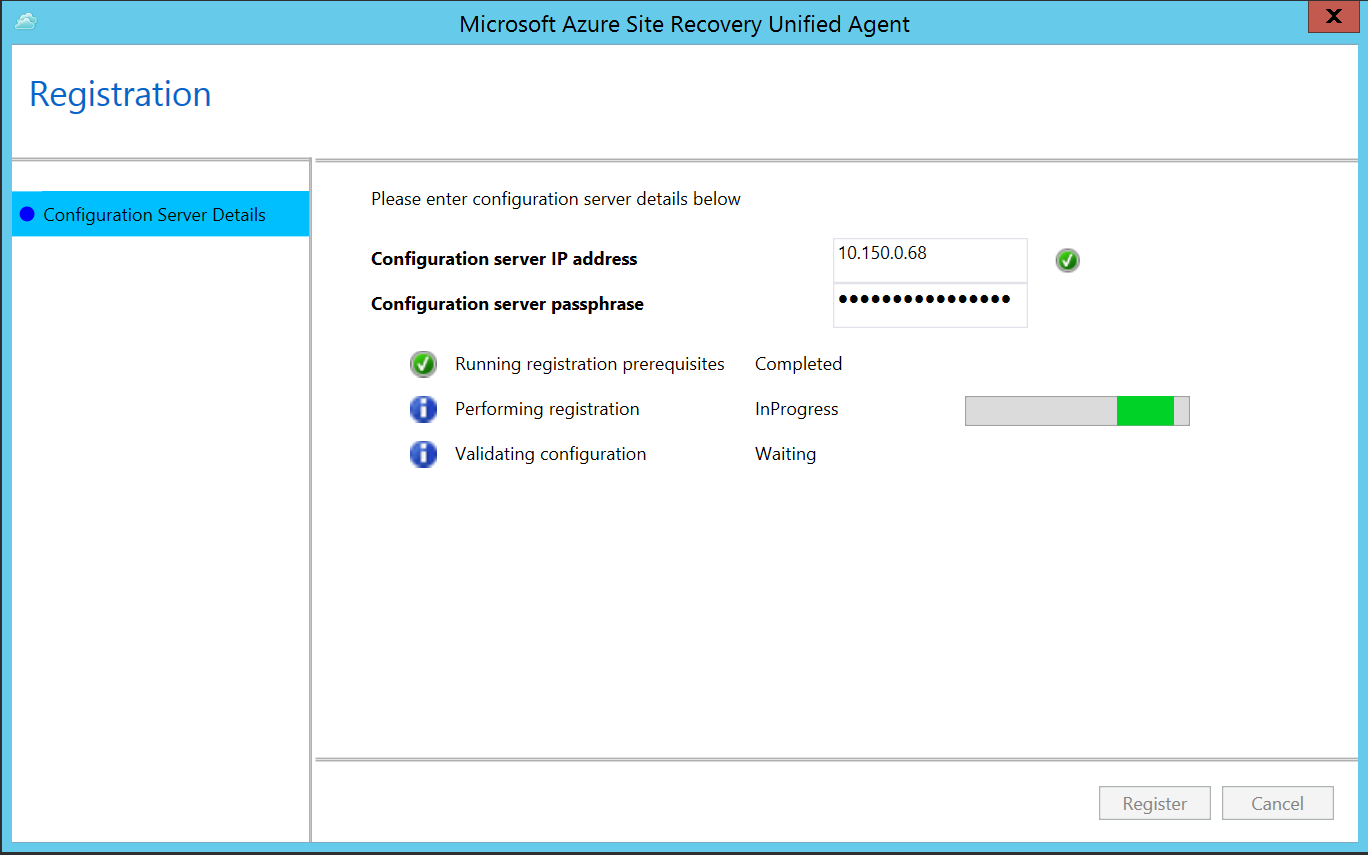
-
Select Register. When registration is finished, select End.
When registration finishes successfully, the server is listed in the Azure portal at Recovery Services Vault > Site Recovery Infrastructure > Configuration servers, in the principal target servers of the configuration server.
Side by side steps
Download and run Site Recovery Deployment Planner.
Feedback
Submit and view feedback for
Source: https://docs.microsoft.com/en-us/azure/site-recovery/site-recovery-plan-capacity-vmware
0 Response to "Any Way to Improve Upload Speed to Another Server via Vmware"
Publicar un comentario